My team and I are excited about the capabilities of the Microsoft’s latest update, SharePoint 2013. We decided to get an instance set up in-house to give it a test drive. The “farm” we are running this instance on consists of just two servers: one running the WFE and Services and another running SQL Server 2010.
*This is not the way a production farm should be setup. This is only for getting SharePoint 2013 up and running so that developers, managers and IT Pros can begin having fun! In a future post, I will tell you the steps taken to publish my first SharePoint App.
*The virtual machines were created by IT. This blog does not cover all needed server configurations, but here are the basics that got me started.
Here’s what I did:
1. Run the “Add Roles and Features Wizard”
2. Add Application Server and Web Server IIS Roles
I then created 2 virtual machines running Windows Server 2012 both with 2GB RAM. One VM is for the database server and the other will host SharePoint.
As a best practice, 8GB is the minimum requirement for a dev install of SharePoint 2013, but this was a workaround I used just to get it up and running. The install worked, but as a result, it was painfully slow. Shortly after the install, a co-worker offered some advice, and we upgraded to 8GB.
3. Install SQL Server 2012 on one of the virtual machines.
The details of the SQL Server Install are not in scope of this post, but I pretty much used default settings and installed all features. But there are a few extra things that needed to be done that I will mention here:
- Make sure your SharePoint Farm Administrator account have dbcreator and and securityadmin privileges in the database
- Make sure the Firewall settings on the database server are correct. In my case I disabled the firewall in the Domain Profile
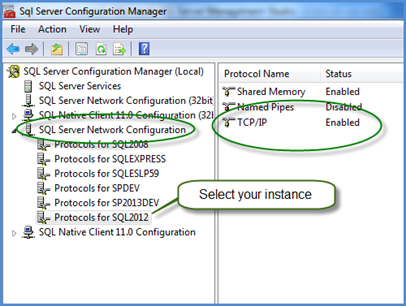
- Make sure TCP/IP Protocol is enabled for the database instance

4. Install SharePoint 2013 on the other virtual machine
- I extracted the SharePoint 2013 ISO to a local folder in my VM OS. You could also mount the ISO. Whatever works.
- Optional: Began documenting the install via copy and paste of screenshots. After this process was complete, a co-worker introduced me to me to PSR.exe (Steps Recorder). This would have saved so much time. See this Windows Server 2012 Sidebar to learn how to search for “PSR” or “Steps Recorder” on Windows Server 2012. I highly recommend using PSR to document the install. Even if you never have time to go back and clean it up, at least you have screen shots. You can also add comments as you go.
- Ran PrerequisiteInstaller.exe followed by a reboot
- Run Install Wizard by running Setup.exe
